Sign and verify
The goal for Mender is to provide a robust and secure software update process. An important part of this is to give the Mender Client the ability to verify that the update comes from a trusted source. One way of achieving this is to sign the Artifact using a protected private key, which you store and use on a Signing system. The Mender Client can then verify it using the corresponding public key. If the signature verification check passes, the client considers the update to come from a trusted source and continues. Otherwise the Mender Client refuses to proceed with the update and raises an error.
Signature management flow
The following diagram shows the high level flow of creating and managing keys and Artifact signatures. These components are essential for the Artifact signing and verification process.
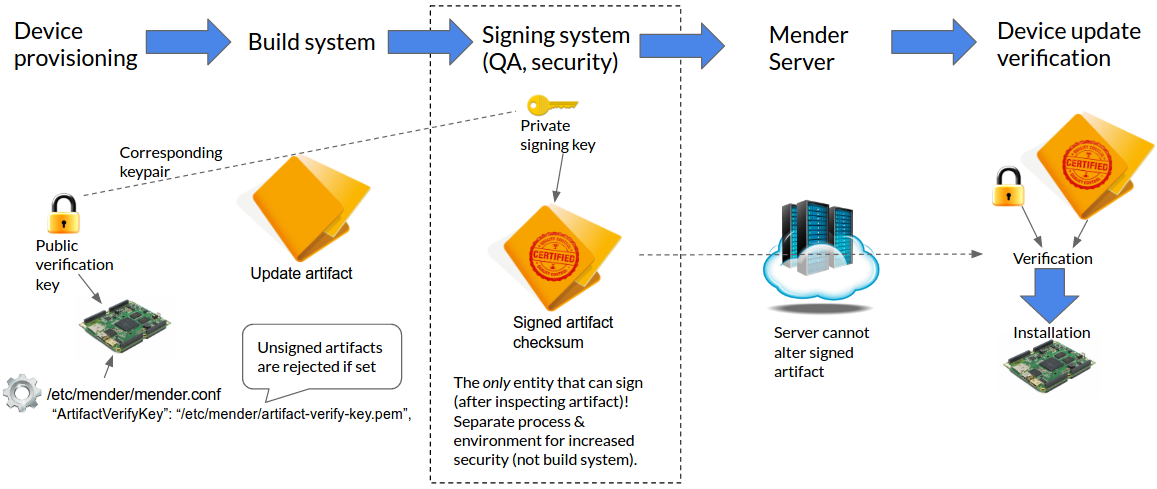
The process begins with provisioning a device with the public verification key, and configuring the Mender Client to use the key (with the ArtifactVerifyKey(s) configuration option). After an Artifact is built, it is signed by the Signing system.
Although it is convenient and possible to use the Build system as the Signing system, this lowers the security as unauthorized access to the private signing key is made easier for potential attackers (e.g. if the Build system is compromised). The best practice is to only sign Artifacts on an offline system, ideally as a manual operation after careful inspection of the Artifact.
After you have created and signed the Artifact you can make it available to the devices running the Mender Client by uploading it to the Mender Server.
During the update installation process, the Mender Client will verify the Artifact using the corresponding public key(s).
The Artifact will only be installed if the verification is successful.
If the ArtifactVerifyKey(s) option is set and Artifacts are not signed or the verification fails, the Mender Client will abort the update process and report an error to the Mender Server.
Multiple keys can be used with the ArtifactVerifyKeys option, in which case the first key that successfully verifies the signature will be used. This is useful for rotating keys or supporting signed artifacts from different sources.
If the Mender Client is configured to enable signature verification (through the ArtifactVerifyKey(s) option), it will reject any unsigned Artifacts. This is necessary because otherwise an attacker could simply inject unsigned Artifacts to bypass the signature verification.
Supported signing algorithms
Mender supports the following signing algorithms:
- PKCS#1 v1.5 (RSA), more formally called
RSASSA-PKCS1-v1_5, with recommended RSA key length of at least 3072 bits - ECDSA with curve P-256
On Linux, both mender-artifact and the Mender Client support the PKCS#11 programming interface to manipulate cryptographic tokens using openssl.
Generating keys
In order to sign and later on verify the signature of the Mender Artifact we need to generate a private and public key pair. Please follow the respective section below, depending on the signature algorithm you want to use.
After generating the keys you will have a file private.key, which you use only on the Signing system, as well as a public.key which you provision all the devices with.
We refer to the file public.key as artifact-verify-key.pem on the devices to avoid ambiguity with other keys.
RSA
To generate a public and private RSA key pair use the commands below:
openssl genpkey -algorithm RSA -out private.key -pkeyopt rsa_keygen_bits:3072
openssl rsa -in private.key -out public.key -pubout
ECDSA256
To generate a public and private ECDSA key pair use the commands below:
openssl ecparam -genkey -name prime256v1 -out private-and-params.key
openssl ec -in private-and-params.key -out private.key
openssl ec -in private-and-params.key -pubout -out public.key
The resulting private.key and public.key files are the private and public keys, respectively.
Signing
We use the mender-artifact tool to create a signed Artifact. Download the
prebuilt mender-artifact binary for your platform following the links in
Downloads section.
There are two ways to sign an Artifact: while creating it with the write
command or for existing artifacts using the sign command.
We add the -k parameter in both cases to specify the private key, which we will use for
creating the signature.
A raw root filesystem
mender-artifact write rootfs-image \
-t beaglebone \
-n mender-5.1.0 \
-f core-image-base-beaglebone.ext4 \
-k private.key \
-o artifact-signed.mender
Make sure the Artifact name specified by the -n parameter in the above command matches the value specified when your filesystem image was created.
An existing Mender Artifact
mender-artifact sign artifact.mender -k private.key -o artifact-signed.menderThe latter is typically the command that the Signing system uses to create a
signed Artifact from an unsigned one originating from the build system. Additionally, if you modify an Artifact using the mender-artifact modify command or any other method, the signature will need to be regenerated..
Verifying the signature
After you create a signed Artifact, you can verify the signature with mender-artifact as well, using the
-k option, but this time with the location of the public verification key.
mender-artifact validate artifact-signed.mender -k public.keyEnable Mender Client signature verification
Signature verification is enabled on the Mender Client using the ArtifactVerifyKey(s) configuration option.
For OS specific instructions on how to install and enable verification keys, visit:
Cloud Key Management
It is possible to sign Artifacts using keys in Cloud Key Management, allowing developers to sign Mender Artifacts without ever accessing the private signing key.
Currently the mender-artifact tool supports:
For more information, check the help screen for the gcp-kms-key, keyfactor-signserver-worker, vault-transit-key, and azure-key options, available by running the command mender-artifact sign --help.
Hardware security
Mender supports the following standards to interact with cryptographic tokens:
- PKCS#11 (feature supported on Linux OS)
Signing
You can use hardware security modules (HSMs), smart cards or Key Storage Provider (KSP) to sign an artifact using the PKCS#11 interface.
First, check if openssl and the necessary libraries are installed:
sudo apt install openssl libengine-pkcs11-opensslNext, proceed to the OpenSSL configuration file:
user@mender:~$ sudo vim /etc/ssl/openssl.cnf
openssl_conf = openssl_init
[openssl_init]
engines = engine_section
[engine_section]
pkcs11 = pkcs11_section
[pkcs11_section]
engine_id = pkcs11
MODULE_PATH = /usr/lib/softhsm/libsofthsm2.so
init = 0
You need to adjust MODULE_PATH according to your system and PKCS#11 interface.
To make sure PKCS#11 engine is available for OpenSSL, issue the following command:
user@mender:~$ openssl engine -t pkcs11
(pkcs11) pkcs11 engine
     [ available ]
Once the engine is set up, you can sign the Mender Artifact using a PKCS#11 URI:
user@mender:~$ ./mender-artifact sign --key-pkcs11 "pkcs11:object=device;type=private" artifact.menderVerifying
You can also verify signed artifacts using the PKCS#11 interface:
user@mender:~$ ./mender-artifact validate --key-pkcs11 "pkcs11:object=device;type=private" artifact.mender