Hosted Mender - tenant migration
Historically we have only had a single instance in the US. Hosted Mender instances are now available in multiple regions as a result of our expansion. This document will describe the migration process if you currently have a fleet of devices operating in one instance and would like to move them to another one.
Migration between instances without risks requires support assistance and is a paid service available only to the Enterprise plan. If you wish to migrate your account please contact us on support@mender.io with the subject Tenant migration.
Please note that this method only applies for hosted Mender instances and isn't applicable for on-premise migrations.
Introduction
Going forward, the following terms will be used for clarity:
- Old server will represent the server that you want to move away from
- New server will represent the server that you want to migrate to
The following steps summarize the procedure for moving from one server to another:
- Make a clone of the old server by contacting Northern.tech
- Update the device with configuration for both servers
- Reject the device on the Old server
- Accept the device on the New server
- Update the with configuration for the New server only
The diagram below, describes the flow
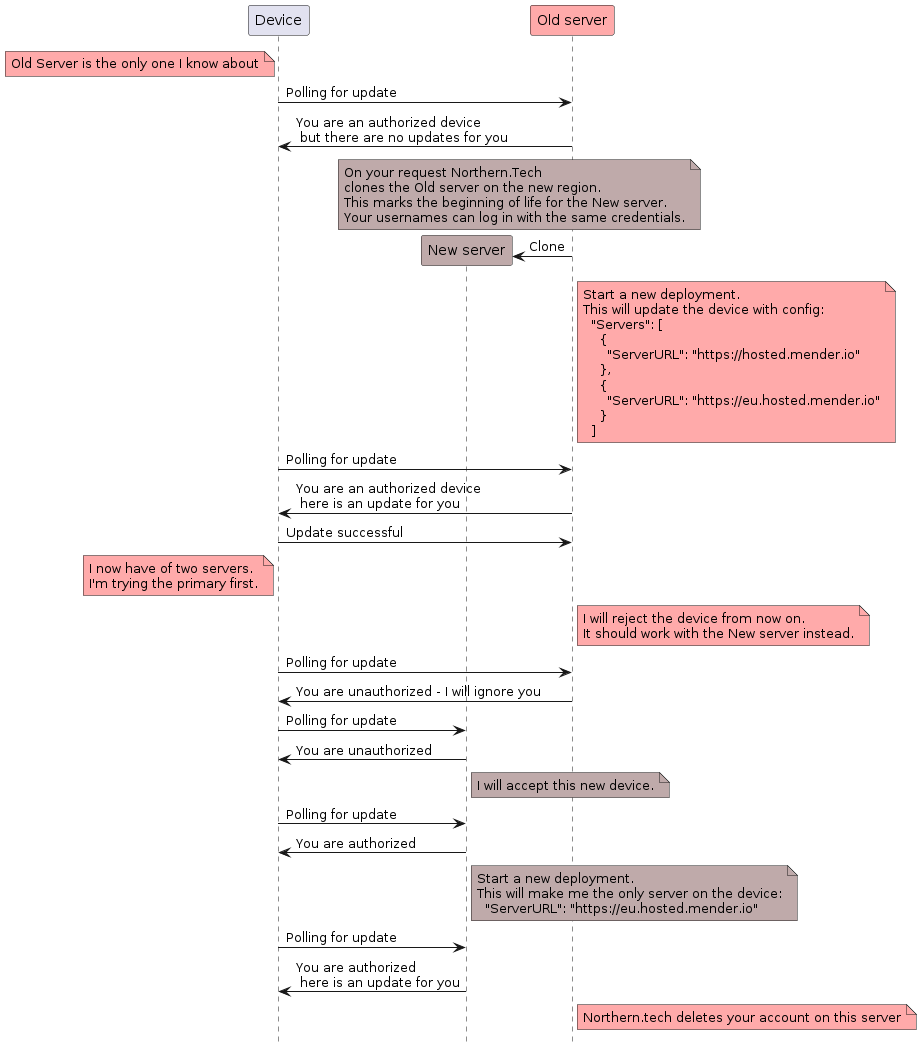
1. Make a clone of the old server by contacting Northern.tech
If you wish to migrate your account please contact us on support@mender.io with the title Tenant migration. In that request please share you "Organization name" as registered in Mender in "Organization and billing". We will get back to you once the tenant has been cloned and you can proceed to the next step.
2. Update the device with configuration for both servers
This will largely depend on the way you create build artifacts.
Regardless of the approach the goal to update the device so it's config (/etc/mender/mender.conf) changes from:
{
    "ServerURL": "https://hosted.mender.io",
    "TenantToken": "abcdefghijklm1234567890",
    ... <Other config parameters>
}
to
{
  "Servers": [
    {
      "ServerURL": "https://hosted.mender.io"
    },
    {
      "ServerURL": "https://eu.hosted.mender.io"
    }
  ],
  "TenantToken": "abcdefghijklm1234567890",
  ... <Other config parameters>
}
Make sure you removed the ServerURL entry from the top of the JSON configuration. More info here.
Please check below for different approaches on how to achieve this:
If you deploy a config file with a badly formatted json, mender-updated on the device won't start correctly after the update.
The device will roll back to the previous version only after the device is restarted by other means.
During that server will show the deployment status as "rebooting" and after the roll back the deployment will fail.
Please make sure to test the migration with one device first before deploying it to the whole production fleet.
3. Reject the device on the Old server
Once the deployment was successful and the device restarts, it will try communicating with the first server on the list. That is the Old server.
As we want to stop the communication with the Old server, reject the device.
4. Accept the device on the New server
As the device cannot connect to the first server on the list (Old server), it will try with the next one. In this case, it is the New server.
5. Update the with configuration for the New server only
Once the device is correctly showing on the New server the last step is to deploy the configuration containing only the New server.
{
    "ServerURL": "https://eu.hosted.mender.io",
    "TenantToken": "abcdefghijklm1234567890",
    ... <Other config parameters>
}
Methods for changing the configuration
Yocto
For Yocto project integrations, if you are already passing your own configuration file to the build,
as described in Customize Mender, modify your mender.conf to include Servers array.
If instead you are relying on meta-mender to autogenerate a configuration file based on variables
you need to first capture the currently generated mender.conf, modify it, and use the Customize
Mender method
to inject it back into the build. The file can be captured from a live device or from yocto
tmp/deploy/ directory (which will depend a bit on your setup).
At the end of the process you should have two mender artifacts:
- one containing the config for both Old and New server
- one containing the config for the New server only
Debian
Similarly for Debian family integrations, if you are already passing your own configuration file with a rootfs overlay, modify your mender.conf to include Servers array.
If instead you rely on the autogenerated mender.conf, capture it, modify it, and set it up in a rootfs overlay.
The fields that need modification are:
ServerURLshall be set to:""(empty string)Serversshall be set to:[{ServerURL: "https://hosted.mender.io"}, {ServerURL: "https://eu.hosted.mender.io"}]
You can do this manually with any text editor or using the jq command:
cat mender.conf | jq '
.ServerURL = "" |   # Blank existing ServerURL
.Servers = [        # Set Servers array of ServerURL(s)
  {ServerURL: "https://hosted.mender.io"},
  {ServerURL: "https://eu.hosted.mender.io"}
]' > mender.new.conf
At the end of the process you should have two mender artifacts:
- one containing the config for both Old and New server
- one containing the config for the New server only